Blog Categories, Settings, and Storefront
Overview
Beyond writing posts, your blog has three areas to configure: Categories for organizing content, Settings for controlling layout and behavior, and the storefront where visitors actually read your blog. All managed from Website > Blog.
Managing categories
Categories help visitors find posts by topic. They also generate their own listing pages (e.g., /blog/category/adventure-travel).
Creating and editing
- Go to Website > Blog > Categories.
- Click New Category, enter a name, and save.
- To edit, click the category name, update it, and save. The change reflects everywhere — listing pages, post pages, and blog cards.
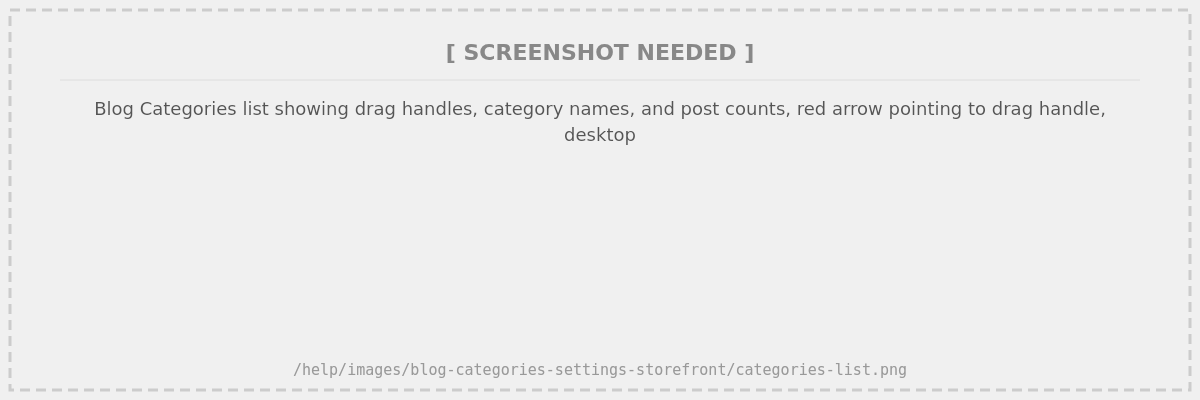
Reordering
Drag categories using the handle on the left side of each row. The order persists and controls how categories appear in the sidebar on your blog listing pages.
Editing category URLs
Each category has an editable URL slug. If you change it, a 301 redirect is automatically created from the old URL to the new one, so existing links and search engine rankings are preserved.
You cannot delete a category that has posts assigned to it. Reassign or remove those posts from the category first.
How to structure categories for a tour operator blog
Think about what your customers search for and how they browse:
- By destination — “Rajasthan”, “Kerala”, “Ladakh” — works well if you operate in multiple regions
- By travel style — “Adventure”, “Family”, “Luxury” — helps visitors self-select
- By content type — “Travel Tips”, “Destination Guides”, “Trip Reports” — useful if you publish varied content
Start with 3-5 categories. You can always add more later, but too many categories with only 1-2 posts each makes your blog look sparse.
Blog settings
Go to Website > Blog > Settings to configure:
Posts per page
How many post cards appear on each listing page before pagination kicks in. 8-12 is a good default — enough to give visitors choices without overwhelming them.
Show author
Toggle whether the author name appears on blog posts and listing pages. If you have multiple authors, showing names adds a personal touch. If all content comes from one account, you might prefer hiding it for a cleaner look.
Blog post layout
Choose how featured images display on individual blog post pages:
| Layout | Description | Best for… |
|---|---|---|
| Hero | Full-width banner with title overlaid on the image | Stunning landscape and travel photography |
| Constrained | Content-width image below the title | Posts where the text matters more than the image, or mixed image quality |
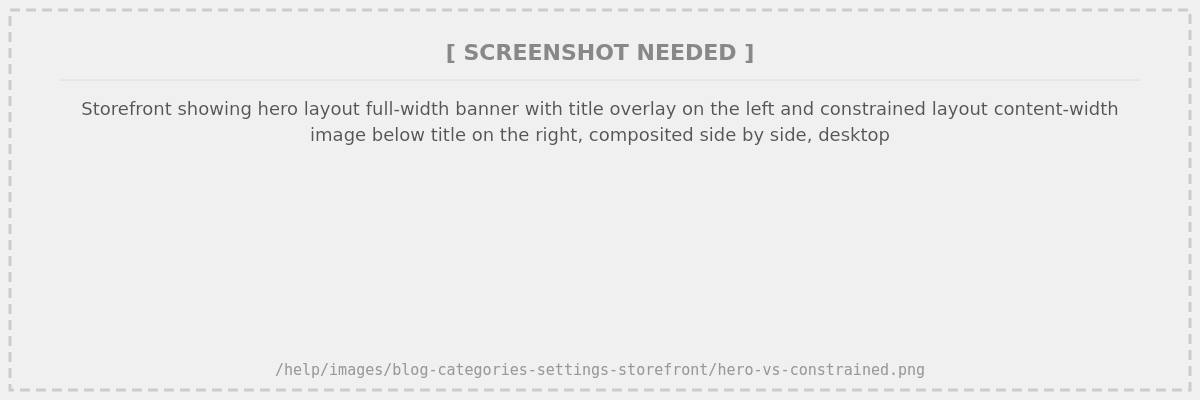
Choose Hero if you consistently have high-quality, wide-format travel photography. Choose Constrained if your image quality varies — it’s more forgiving with smaller or lower-resolution images. This setting applies to all posts.
Blog URL prefix
The default prefix is /blog, making your blog available at www.yourdomain.com/blog. You can change this (e.g., to /stories or /journal).
Changing the blog URL prefix does not update existing post URLs. If you’ve already published posts and shared their links, those old URLs will continue working, but new posts will use the new prefix. A warning reminds you of this when making the change.
Auto-create listing pages
Two toggles control automatic listing page creation:
- Auto-create category listings — When enabled, creating a new category automatically generates a listing page at
/blog/category/{slug}. - Auto-create author listings — When enabled, each author with published posts gets a listing page at
/blog/author/{slug}.
Disabling these toggles removes the corresponding listing pages from your sitemap and storefront.
How your blog looks on the storefront
Blog listing page
Your main blog page (/blog) shows a paginated grid of post cards with a sidebar listing categories and authors. Visitors can click through to category or author listing pages to filter posts.
Category and author listings
Category listings (e.g., /blog/category/adventure-travel) show only posts in that category. Author listings work the same way. Both use the same grid + sidebar layout.
Empty listing pages (no published posts matching the filter) return a 404 and are excluded from sitemaps automatically.
Blog post pages
Individual posts display:
- Breadcrumbs — Home > Blog > Post Title (visible on desktop and mobile)
- Featured image — in your chosen layout (hero or constrained), or no image if none was uploaded
- Post metadata — date, categories (clickable), and author (clickable, if enabled)
- Content — body text followed by any additional content sections
Sitemaps
Published blog posts and active listing pages are automatically included in both your XML sitemap (for search engines) and HTML sitemap (for visitors). Blog posts use a priority of 0.60 and listings use 0.55.
Related Articles
- Creating and Managing Blog Posts — write, publish, and manage individual posts
- Adding a Blog Cards Section to Your Pages — showcase posts on other pages
- Getting Started with Your Blog