Creating and Managing Blog Posts
Overview
Blog posts are managed from Website > Blog > Posts in your backoffice. Each post has a three-tab editor: Post (title, body, featured image), Content Sections (additional content blocks), and SEO (meta tags and URL).
Creating a new post
- Go to Website > Blog > Posts.
- Click + Add Blog Post. The post starts in Draft status and opens the Post tab.
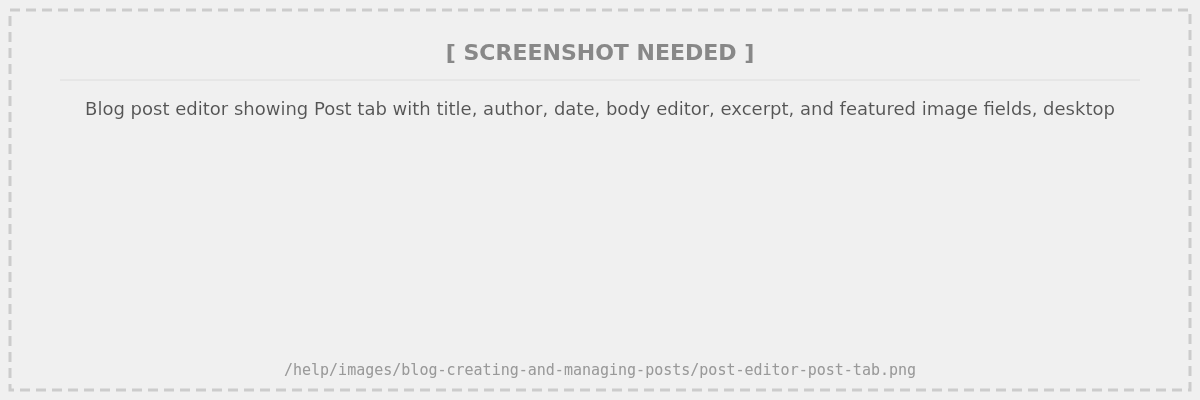
- Fill in the post details:
- Title — your post headline
- Author — click the avatar circle to change the author (defaults to your account)
- Published Date — set manually, or it auto-fills when you first publish
- Body — write your content using the rich text editor. You can upload images directly from the editor toolbar.
- Excerpt — a short summary shown on listing pages and blog cards (2-3 sentences works well)
- Featured Image — click Add Images to upload, then use the focus picker to set the focal point for cropping
- Click Save.
The focus picker lets you mark the most important part of your featured image. This ensures the focal point stays visible when the image is cropped for different layouts (hero banner, blog cards, mobile views). Click on the image to set the focus point after uploading. See Banner images and focus points for a detailed guide.
Adding content sections
The Content Sections tab lets you build richer posts by adding sections below the body text — the same section types available on static pages. Popular choices for blog posts include:
- Rich Content — additional text with photo gallery, images, and embedded media
- Tour Cards — a carousel of specific tours (great for “Top 5 Treks” style posts)
- Collection Cards — showcase tour collections
- Testimonial — customer quotes
- Blog Cards — showcase other blog posts
Many other section types are available in the dropdown (Inquiry Form, Team Members, Address, etc.). The only section type NOT available for blog posts is Banner Slides.
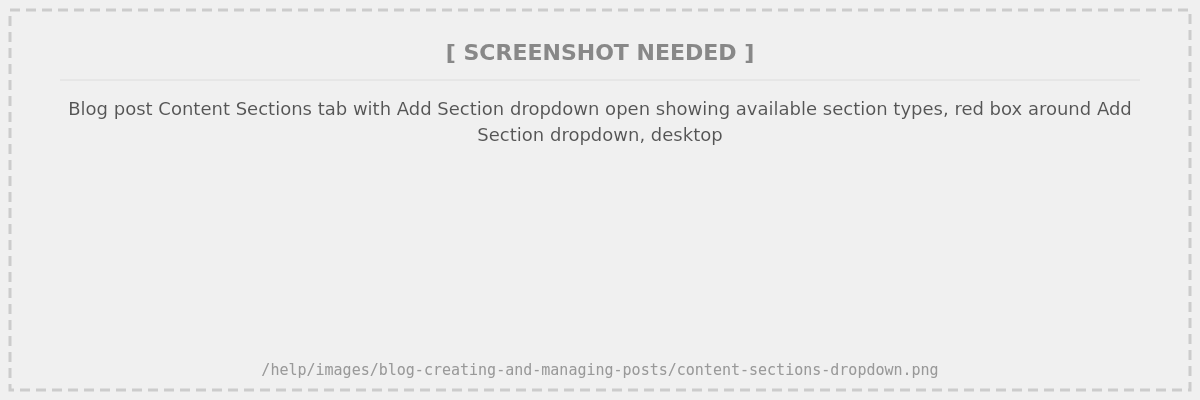
- Go to the Content Sections tab.
- Click + Add Section, then choose a section type from the dropdown.
- Configure the section (e.g., select tours for a Tour Cards section).
- Drag sections to reorder them.
The body section (Rich Content) is always present and cannot be removed or deactivated. It syncs with the body editor on the Post tab.
When to use content sections vs the body editor
The body editor is perfect for straightforward text-and-image posts. Content sections shine when you want to embed interactive elements — for example, a blog post about “Best Weekend Getaways from Mumbai” could have a Rich Content introduction, followed by a Tour Cards section linking directly to bookable tours, then a closing Rich Content section with practical travel tips.
Editing SEO fields
The SEO tab lets you control how your post appears in search results and social media. It has two columns:
Page SEO (left column):
- Edit the Meta Title (appears in browser tabs and search results).
- Edit the Meta Description (the snippet below the title in search results).
Facebook Post Settings (right column): 3. Edit the Post Title and Post Description (used when the post is shared on social media — defaults to your meta title and description). 4. Upload a Post image via Add Images (the image shown in social media previews).
The URL at the top of the tab shows your post’s full address. Edit the path portion to change the slug.
Click Save when done.
If you leave the meta title blank, it defaults to your post title. Write a custom meta title when you want the search result to read differently from the post headline — for example, including your destination name or a call to action. For more advanced SEO settings like schema markup and redirects, see SEO Center.
Publishing and unpublishing
Posts have three statuses:
| Status | Visible on website? | In sitemaps? | Use when… |
|---|---|---|---|
| Draft | No (returns 404) | No | Writing or editing — not ready for anyone to see |
| Published | Yes | Yes | Ready for the public |
| Unlisted | Yes (via direct URL only) | No | Sharing a preview link with colleagues before going public |
To change the status, use the status dropdown in the top-right of the post editor (shows “Draft”, “Published”, or “Unlisted” as a colored button), then save.
Use Unlisted to share a preview link with your team before officially publishing. The post won’t appear in listings or sitemaps, but anyone with the direct URL can view it.
Deleting a post
- Open the post you want to delete.
- Click the Delete button and hold for 2 seconds to confirm. A progress bar shows the countdown.
- Release early to cancel.
Deleting a post permanently removes it and its URL from your website.
Best practices for tour operator blogs
- Use featured images consistently. Posts with compelling travel photography get more clicks in listings and blog cards. Use the focus picker to ensure faces and landmarks stay visible at all crop sizes.
- Write excerpts that invite clicks. The excerpt appears on listing pages and blog cards — treat it like a teaser. “Discover why Ladakh in September offers clear skies, fewer crowds, and the best festival season” works better than “This post is about Ladakh.”
- Embed tour cards in relevant posts. A blog post about “Top 5 Family-Friendly Beaches in Goa” should include a Tour Cards section linking to your actual Goa beach tours. This turns blog readers into potential bookers.
- Publish consistently. Even one post per month builds your search presence over time. Focus on topics your customers actually search for — destination guides, travel tips, packing lists, seasonal highlights.
Related Articles
- Blog Categories, Settings, and Storefront — organize posts and customize your blog’s appearance
- Adding a Blog Cards Section to Your Pages — showcase posts on your homepage
- Getting Started with Your Blog