Set up automated messaging rules
Overview
Notification rules let you send a message automatically when something happens. Each rule follows a simple pattern: when [a trigger fires] → send [an email or WhatsApp message]. For example, send a thank-you email when a booking is confirmed, or a reminder two days before the trip starts.
Rules live under Settings → Emails, WhatsApp & SMS → Notification Rules.
Creating a rule
- Go to Settings → Emails, WhatsApp & SMS and open the Notification Rules tab.
- Click Add Rule.
- Give the rule a name you’ll recognise later (for example, “Pre-trip reminder”).
- Choose a trigger — the event that makes the rule fire.

Triggers you can choose from
- Booking events — confirmed, cancelled, rejected, updated, or pending confirmation
- An inquiry is submitted
- A cart or payment is abandoned
- A payment link is sent, or a payment succeeds
- A customer or passenger is updated
- A scheduled trip notification — a set number of hours or days before or after a trip
Chasing pending payments? You don’t need a rule for that. Scheduled payment reminders are built into the payment request itself — set them when you send a payment link. See How to send payment links to customers.
Scheduling messages before or after a trip
The scheduled trigger is how you send pre-trip and post-trip messages. Set the timing as an offset — for example, 2 days before the booking starts, or 1 day after the booking ends.
You can also limit the rule to bookings in particular states using Fire when booking is — so a pre-trip reminder, for instance, only goes to confirmed bookings.
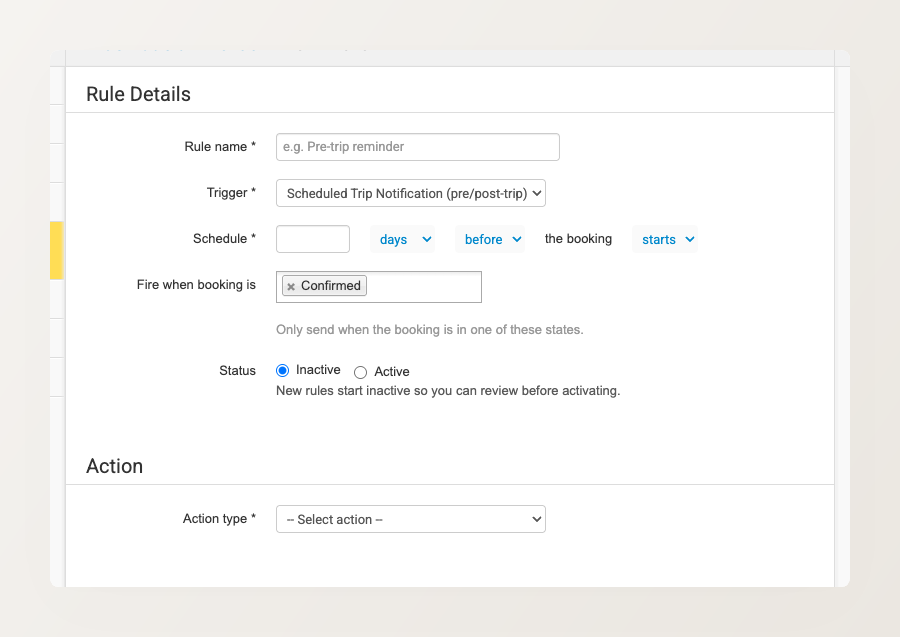
Because the timing is an offset you choose, you can set up several scheduled rules for the same trip — for example reminders at 7 days, 3 days, and 1 day before departure — each as its own rule.
Choosing what gets sent
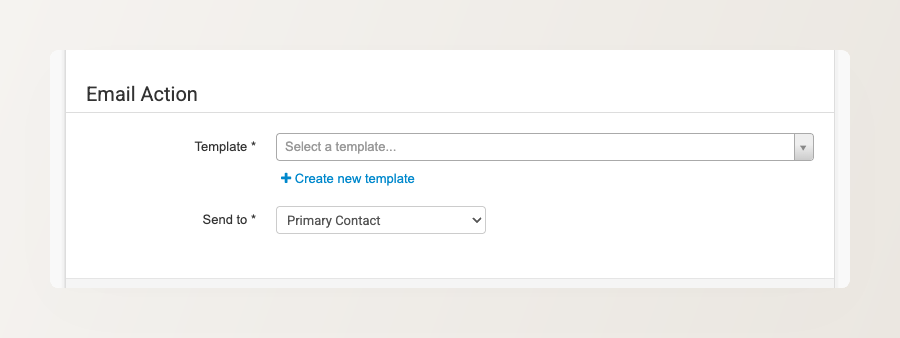
- Under Action, choose Send Email or Send WhatsApp Message.
- For an email action, pick a template for the message (or click Create new template to make one), and choose who it goes to under Send to — the primary contact, all passengers, your manager emails, or a fixed address.
Send WhatsApp Message Add-on Available as a paid add-on. — A WhatsApp action needs a connected WhatsApp provider. See WhatsApp notifications to set one up.
Activating a rule
New rules start as Inactive so you can review them before they go live. When you’re ready, set the rule’s status to Active — it begins firing from then on. You can switch a rule back to Inactive at any time to pause it.
Apart from the scheduled trigger’s booking-state filter and timing offset, rules don’t have other per-trigger conditions — a rule fires on every matching event. Plan your rules accordingly, and use the Inactive status to test before going live.